A guide to bugs: where to find them and what to do with them
Here are three assertion writing techniques and a software engineering process to apply them.
TensorFlow is a powerful, open-source computation toolkit that’s widely used to implement machine learning models. For example, Secondmind researchers have developed GPflow to implement Gaussian processes on top of TensorFlow. But writing correct TensorFlow code can be difficult.
In this article, I’ll introduce three assertion writing techniques and a software engineering process to apply them. They make debugging TensorFlow code much easier and ensure that your code is correct with respect to algorithm definitions provided by research.
The problem
Debugging TensorFlow code is hard. You can log and investigate tensor values via summaries or the TensorFlow debugger. But evaluated tensors are multidimensional NumPy arrays, which makes investigation difficult.
Tips on how to debug TensorFlow code can help, but they can’t ensure that your code is correct.
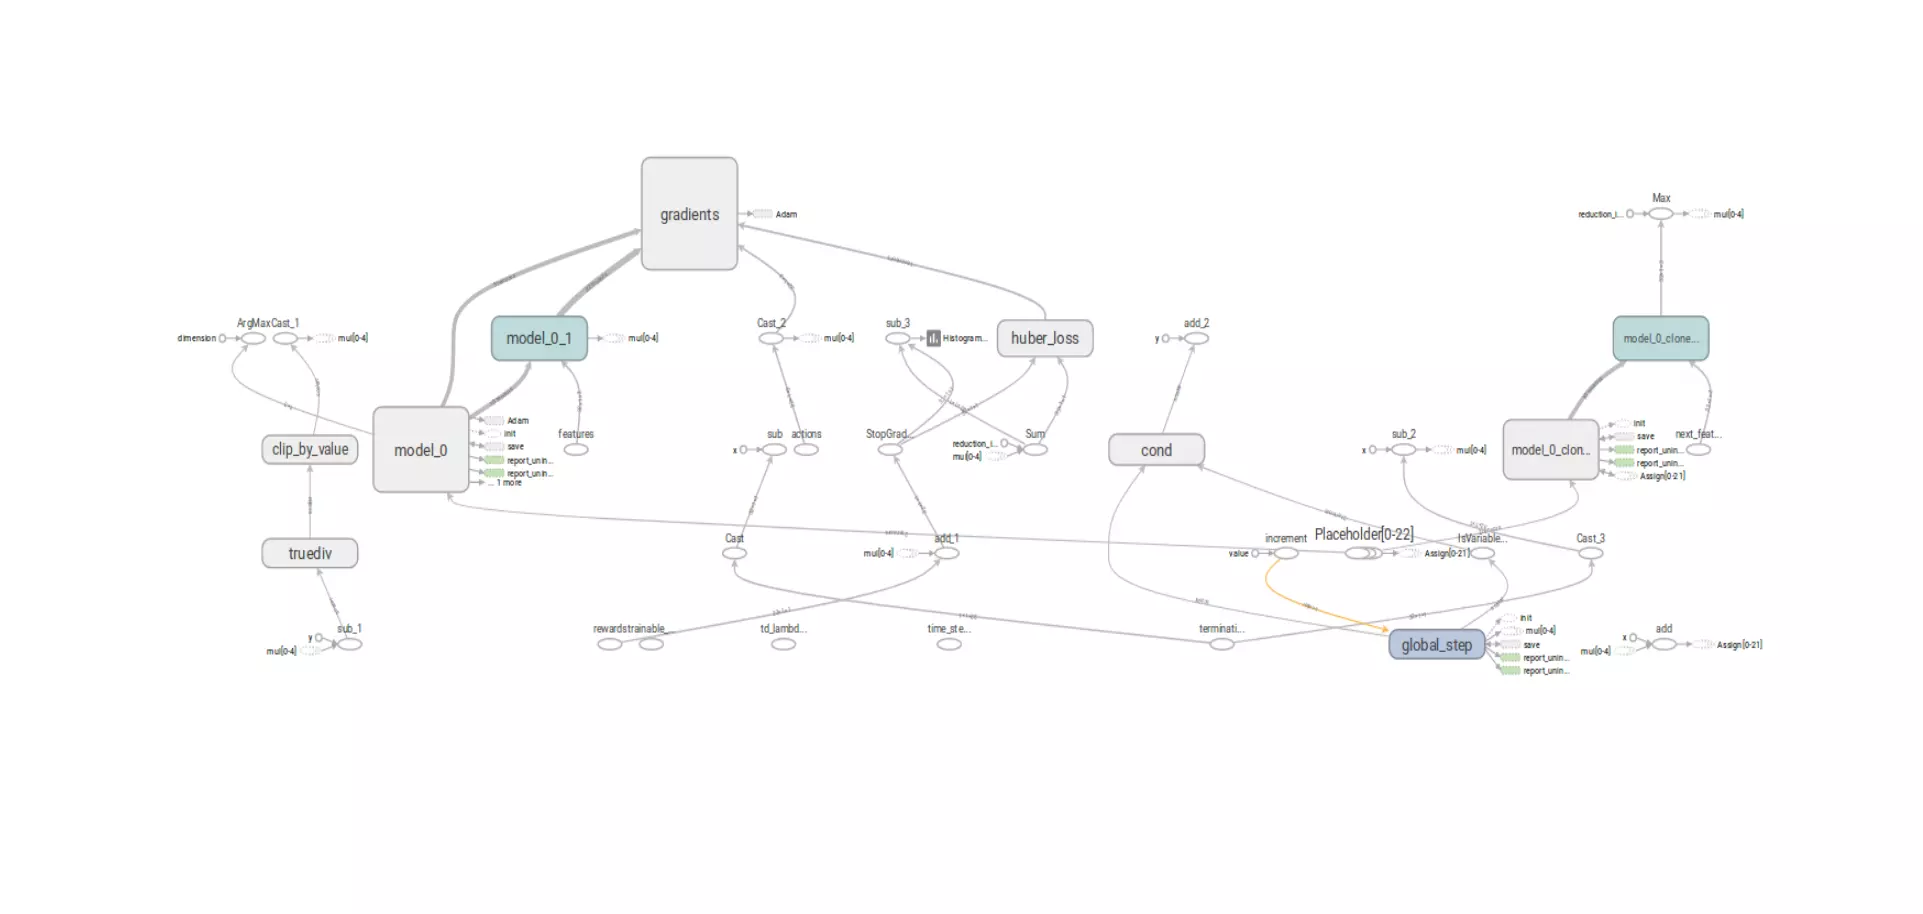
Graph visualizations from TensorBoard provide too much detail (see Figure 1), making them hard to use. Yet it’s crucial to ensure your graphs are structurally correct.

To solve these problems, you need specifications to help you reason about correct code implementation. Specifications describe what the code is supposed to do, and implementations describe how to do it. A piece of code is correct only with respect to its specification. You might have specifications for your TensorFlow code in mind, but writing them down is tricky.
The solutions
These three techniques for writing specifications all use Python assertions that you can put directly in your code.
Technique 1: tensor shape assertions
When you introduce tensors, you need to write asserts to check their shape. Often, incorrect assumptions about a tensors’ shape can be hidden by TensorFlow’s broadcasting mechanism when it runs the code.
For example, in deep neural network reinforcement learning (e.g. DQNs), you usually have a prediction tensor, a target tensor, and a loss tensor:
Listing 1. Typical tensors in DQN
Here, prediction_tensor is aliased to the output of the Q-value network; target_tensor represents a desired value, bootstrapped from next states; and loss_tensor defines our training loss function.
The next listing shows the shape assertions for the introduced tensors. These assertions check that the shape of the prediction_tensor and the target_tensor must be the same in terms of batch_size and action_dimension. Because loss_tensor evaluates to a single number, its shape is []:
Listing 2. Tensor shape assertions
You’ll get an assertion violation when running the code if the shape of a tensor does not match the expected shape defined in the corresponding assertion.
Technique 2: tensor dependency
After checking that the tensors have the right shape, you make sure the graph’s structure correctly reflects tensor dependencies in your mind. If the value of tensor B depends on the value of tensor A (e.g. B=A+1), then there should be an edge from node B to node A in the graph.
The visualization of an entire TensorFlow graph can have hundreds of nodes and edges, making it very difficult to understand. But you only need to visualize the relationships between the tensors you’ve introduced, and you can often group many tensors into a single node. In a multilayer neural network that has many variables, for example, each variable is a tensor; but you can visualize the whole neural network as a single node.
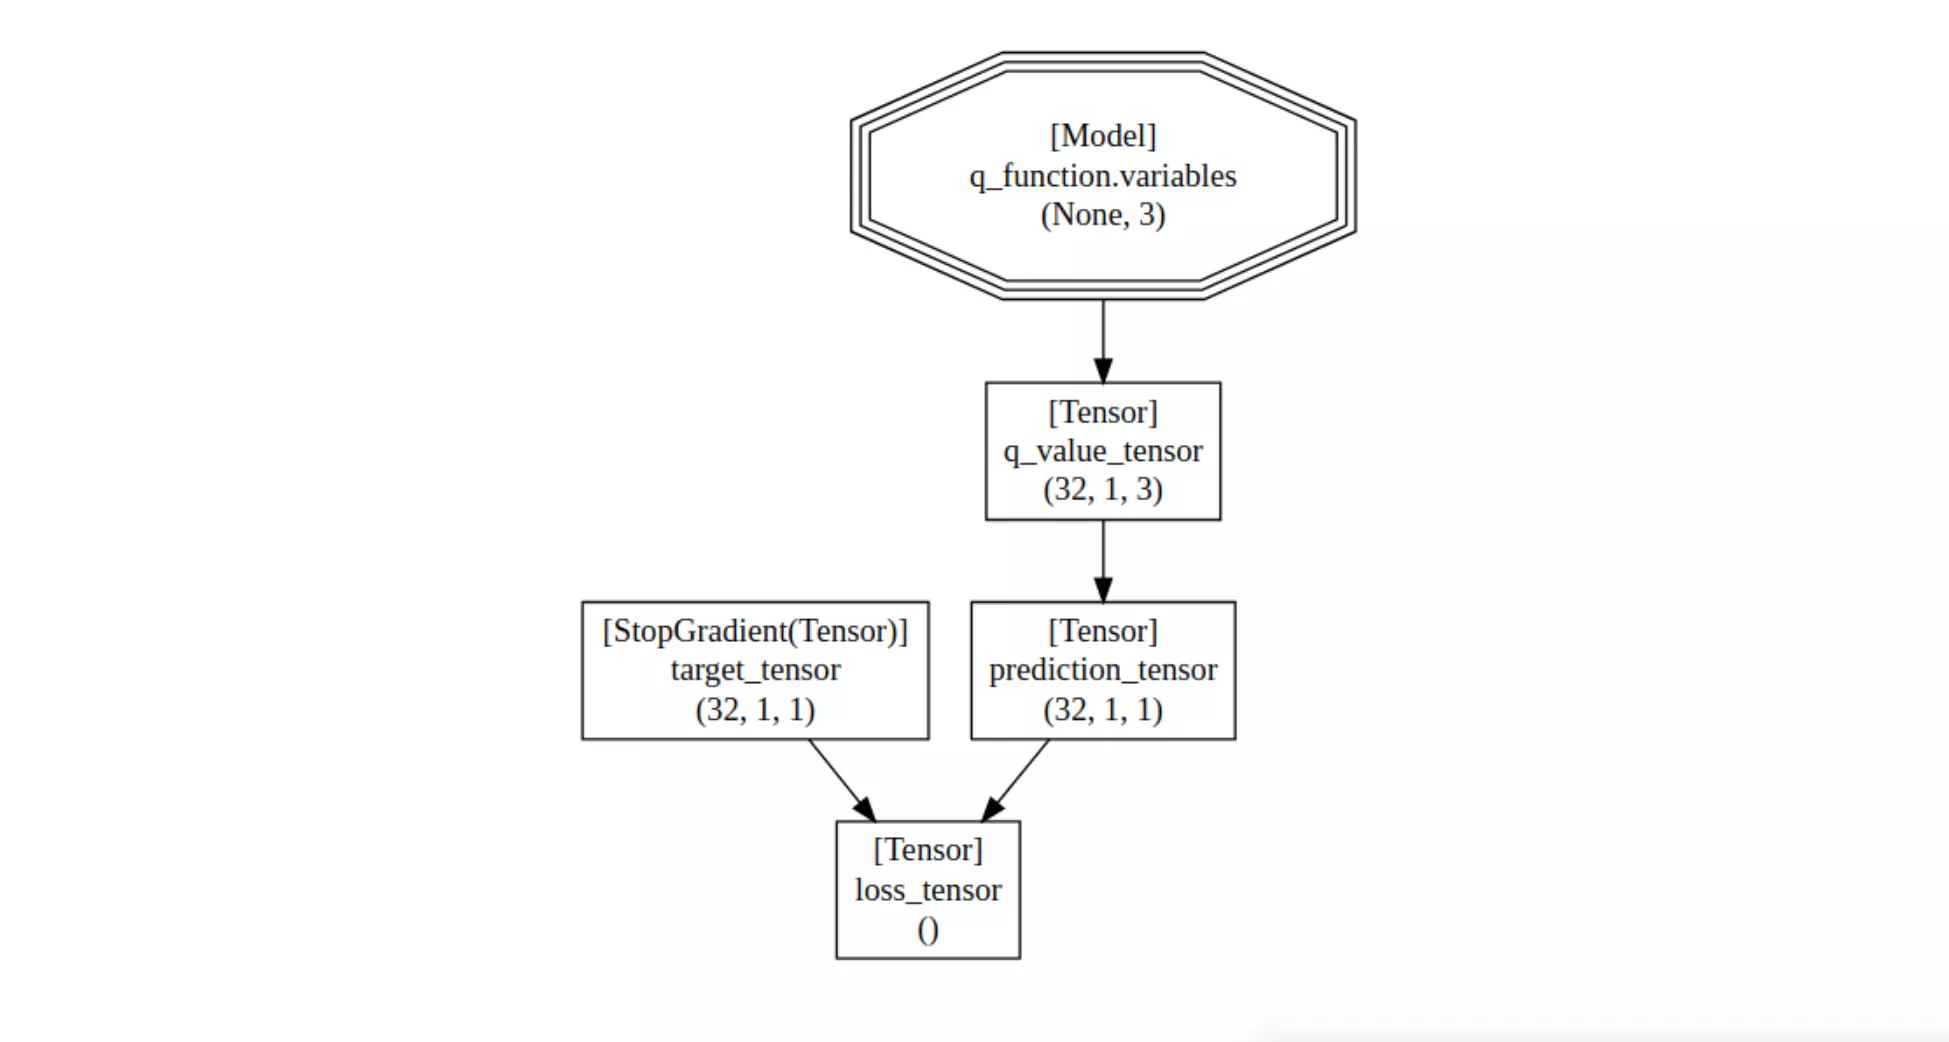
We’ve developed a new Python package—called TensorGroupDependency—that allows you to register only the tensors you want to visualize. It generates a new, much smaller visualization showing only those tensors. You first call the add method to register the tensors into the TensorGroupDependency class, and then call the generate_dot_representation method to give you a visualization of only those tensors and their dependencies. Here's how to use it:
Listing 3. Generate visualization with TensorGroupDependency
And here's the visualization:

It includes the following information:
A node in the graph represents a tensor or set of tensors (such as all variables in a neural network).
There's a directed edge from node B to node A if at least one tensor in B depends on a tensor in A.
In each node, you see the kind and shape of the tensors.
To check the correctness of the graph structure, you need to explain why every edge exists (i.e the dependency relationship between those tensors). If you’re unable to explain the existence of certain edges, there’s a discrepancy between the idea in your mind and the actual code you’ve implemented. This usually signifies a bug.
When you’re done explaining the existence of each edge in the graph, you can call the generate_assertions method of the TensorGroupDependency class to generate all the assertions that describe the graph structure. The following listing of generated assertions becomes part of your code and will be checked in all future executions:
Listing 4. Automatically generated tensor dependency assertions
Technique 3: tensor equation evaluations
So far, you’ve validated the dependency relationships between the tensors you defined. The final step is to validate that the dependencies perform correct numerical calculations. For example, the equations B = A +1 and B = A -1 both introduce a dependency from B to A, so their dependency graph is the same. But you need to specify that B=A+1 is the correct implementation, not B=A-1. Do this using tensor equation evaluations:
For each equation in your algorithm, evaluate the tensors in each optimization step by adding them in session.run in an optimization step.
Write the same equation in NumPy with those tensor evaluations and assert the expected value is the same as the corresponding paper definition.
The next listing shows the tensor equation evaluation for the loss tensor. The sess.run evaluates the parameter_update_operations, as well as the tensors involved in calculating loss. Then you calculate mean_square_error using evaluations of the target_tensor and the prediction_tensor. Finally, you assert that the loss_tensor evaluation is equal to our calculated mean_square_error.
Listing 5. Tensor equation evaluations
The results
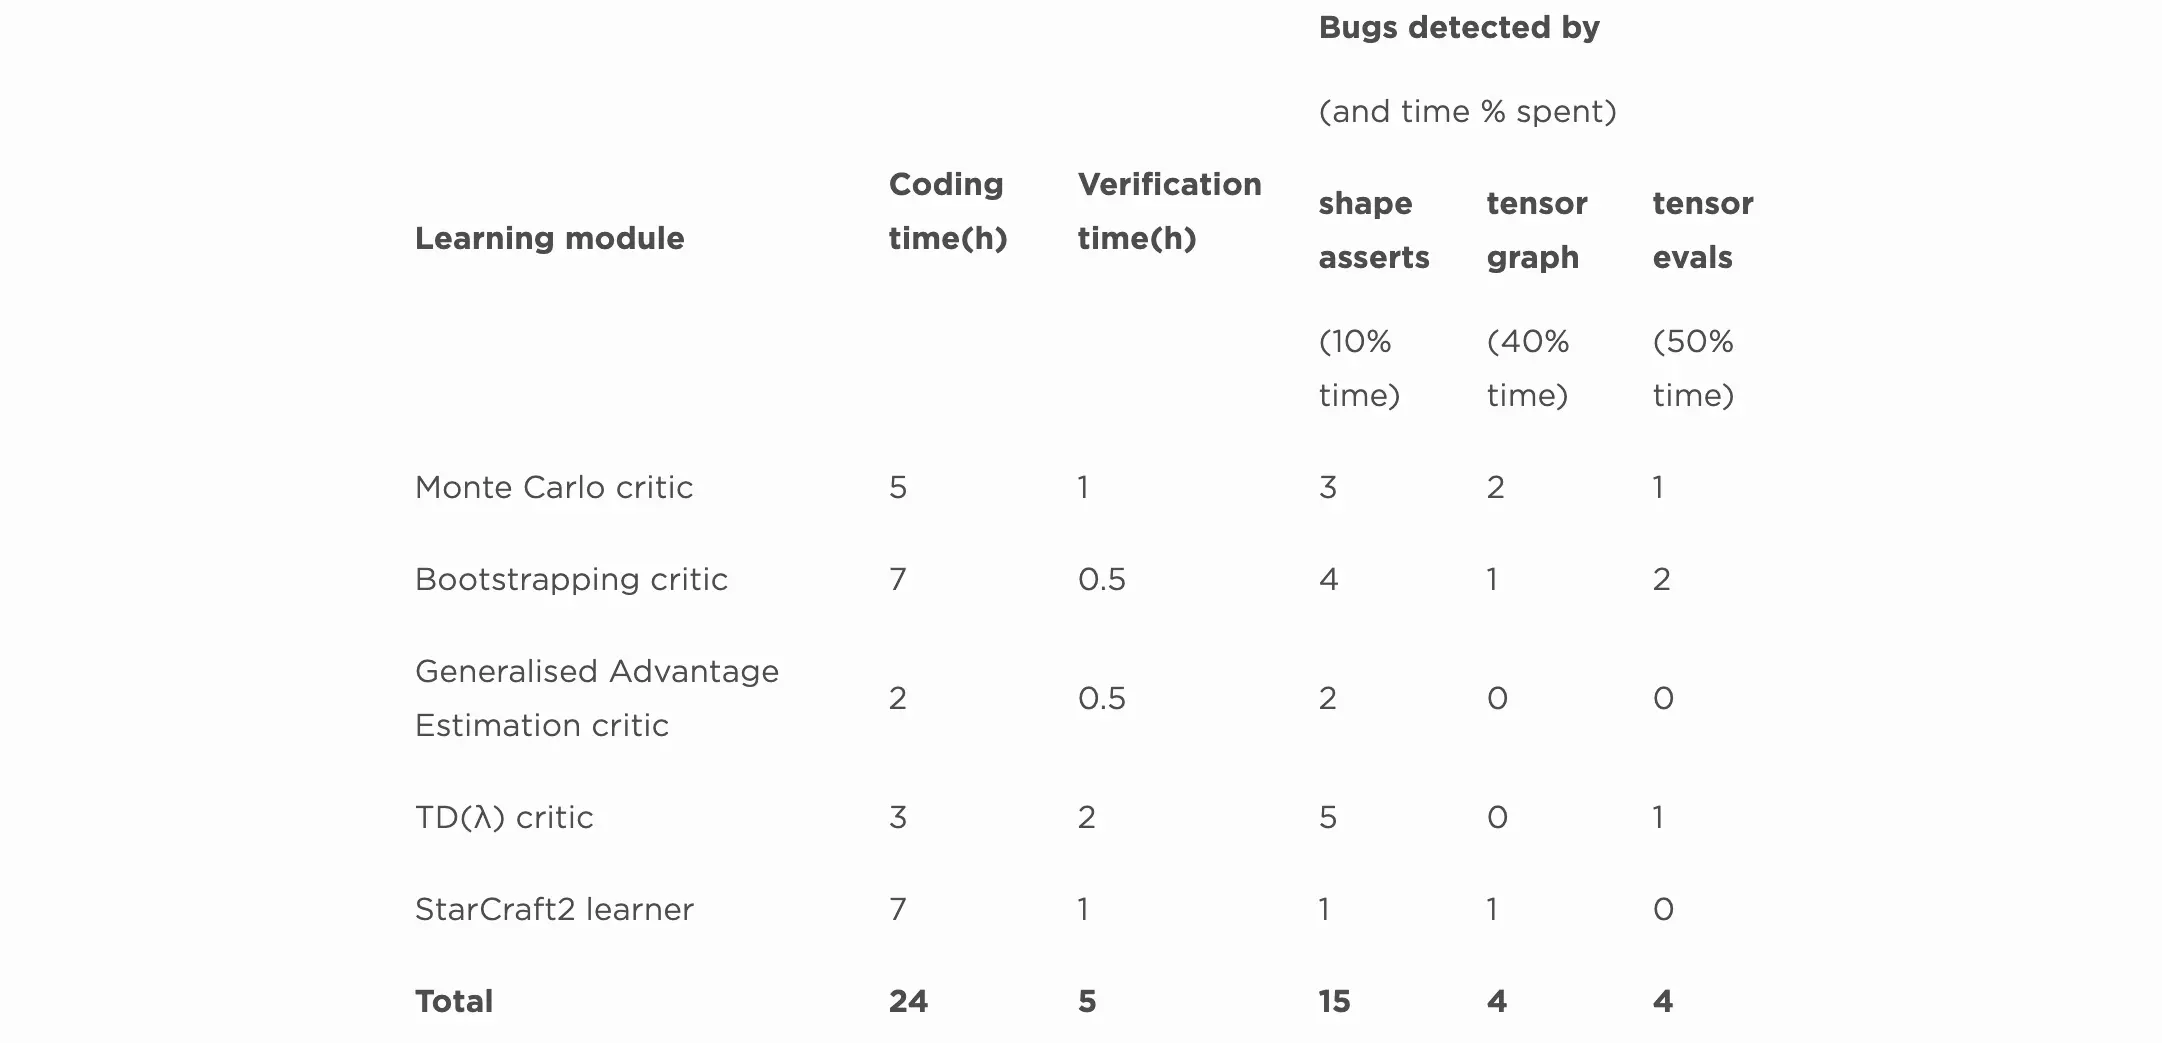
We have applied these techniques to all our TensorFlow-based learners. The following table reports the number of bugs we found while developing five machine learning modules:

The “Learning module” column lists the name of the code. These are critics in Actor-Critic algorithms. The StarCraft2 learner is an Actor-Critic learner from the paper StarCraft II: A New Challenge for Reinforcement Learning. These are all learning modules in deep reinforcement learning.
The “Coding time” column reports the time in hours we spent writing the code of those learners; in total, we spent 24 hours.
The “Verification time” column reports the time in hours spent applying our three techniques to verifying the correctness of the learners. We spent five hours writing the assertions, running the code, observing assertion violations, and fixing detected problems. Note that an assertion violation doesn’t necessarily mean that the implementation is wrong. It only indicates a discrepancy between the implementation and the specification: either—or both— might be wrong. In this experiment, about half of the time the specification is wrong and the implementation is actually correct. In any case, those discrepancies point towards a need for validation.
The “Bugs detected by” columns show the number of bugs found and the percentage of verification time spent when applying each of the techniques. In total, we detected 23 bugs in only five hours. More importantly, after applying the techniques, we knew that we had validated the correctness of our code against the algorithm definitions.
The three subcolumns break down the time we spent in applying each assertion technique and the number of bugs detected. These columns reveal that by investing a little time in simple shape assertions in the early stages, we already found a lot of bugs. Fixing those bugs early made locating other, more involved, bugs via other techniques easier.
The reasons
Why are these assertion techniques effective for detecting bugs?
Firstly, they require you to define the correctness of your code by writing down the specification. Writing specifications is not a new idea, but our techniques make it more practical:
Shape assertions require you to write down the shapes of the tensors that you introduce—easy!
Tensor dependency requires you to focus only on the tensors you introduce, excluding all TensorFlow operations and naming spaces. This reduces the graph from hundreds of nodes to a dozen or so, making human investigation practical. Assertion generation also reduces the time needed to write down assertions.
You validate every equation in NumPy, which is easier than TensorFlow’s language.
Secondly, finding where a bug originates is daunting in TensorFlow. When applied in order, our techniques help you localize faults. When you have a problem in the tensor dependency stage, you know that the shapes of all the involved tensors are correct. When you have a problem with a tensor equation, you know that the dependency structure is correct. In short, you can better focus on and locate every problem.
Thirdly, these techniques turn verifying TensorFlow code from a chore into a software engineering process that ensures the code is verified if you follow a simple to-do list:
Write a shape assertion for all tensors you introduce.
Explain all dependency edges between those tensors, and generate structural assertions automatically.
Write an assertion to check every equation from the algorithm.
A common problem when validating and testing code is knowing how to proceed and when to stop. Which part of the code do you start on? Which aspects should you check? How will you know when you’ve tested enough? Our three assertion techniques remove these doubts. You apply them one by one and each technique has finite and manageable steps that are bounded by the number of tensors and equations you introduced in your code— usually around a dozen. In the end, you know your code is validated against the research paper definition. Don’t overlook the power of such an engineering process; when people know the exact steps, they’re a lot more efficient.
I need to make it clear that these techniques can validate the code’s correctness only with respect to the research paper definition; they can’t check if the code actually learns meaningful models. That’s covered by common machine learning practices such as plotting the loss over time, cross-validation, etc.
These three techniques—tensor shape assertions, tensor dependency, and tensor equation evaluations—are widely applicable to all kinds of TensorFlow code. The software engineering process to apply them is practical and efficient for both researchers and machine learning engineers. Without them, we used to spend weeks debugging a piece of TensorFlow code and yet still had no idea how correct the code was! Going forward, code equipped with specification will also enable us to develop advanced testing methods such as automated test case generation, further reducing the chore of manually verifying TensorFlow code.


